Plan meetings for your project and send invitations
iMeetingX already offers a range of templates for the most important meeting types. Of course, new meetings or templates can be created with a few clicks.
Once a meeting is created using the + button, it will be displayed in the left sidebar in the „Meetings” area. iMeetingX now ensures that changes to meetings, regardless of where they are made, are updated in all relevant areas and sections of the application.
When the planning of the meeting is complete, iMeetingX can be used to either email or print an invitation. To do this, select the desired meeting in the „Meetings” area and either click „Send Invitation” or „Print Invitation” in the toolbar.
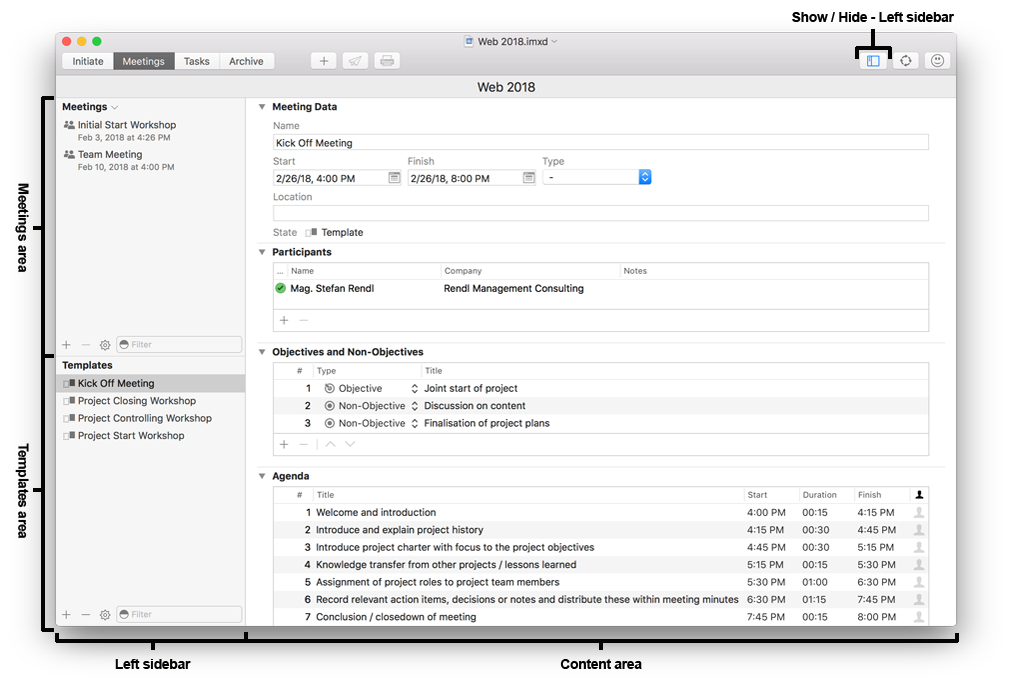
All planned meetings are listed in this area. Archived meetings will be automatically removed from this list.
Further options to show or hide planed meetings are available by clicking on the ﹀ button next to the heading „Meetings”.
Use the + or - button to create new meetings or to delete unwanted meetings. In the context menu („action” button ![]() ) there are also functions like: „Duplicate Meeting”, „Save Meeting as Template”, “Send or Print _Invitation”, „Archive Meeting”, etc.
) there are also functions like: „Duplicate Meeting”, „Save Meeting as Template”, “Send or Print _Invitation”, „Archive Meeting”, etc.
After „Send Invitation” or „Print Invitation” is activated at the end of this process, the meeting status changes from „Planned” to „Invited”. iMeetingX sends invitations per Email as PDF files, attachments are automatically attached, and an ICS document with the meeting appointment is also attached. The PDF file of the created invitation is accessible under „Attachments” in the content area.
Once „Automatically Add Meetings to Calendar” in the section „Initiate” is activated, the appointment will be entered into the selected calendar.
Predefined templates can be accessed, or new templates can be created here.
Use the + or - button to create or delete templates or choose „Add Template” in the context menu („action” button ![]() ).
).
In iMeetingX, any planned meeting can be saved as a template. To do this, click on the corresponding meeting and choose „Save Meeting as Template” from the context menu („action” button ![]() ).
).
To create a meeting from a template, click on the preferred template and choose „Create new Meeting from Template” from the context menu („action” button ![]() ).
).
Depending on the selection, the properties of the meeting or template are shown.
Meeting Data
- Name: Description of meeting. The meeting name will also be visible later in the invitation or the meeting minutes.
- Start: Time of meeting start. This value will also be used as the starting time in the agenda.
- Finish: Time of the meeting conclusion. If you are planning an agenda, you do not need to enter a value, as iMeetingX will do this for you automatically.
- Type: Allocation of a defined meeting type from „Meeting Type” in the „Initiate” section.
- Location: If possible, describe the place of the meeting, for example using an address, to ensure that all participants will find their way to the meeting place.
Participants
Use the + button to assign participants or groups involved in the meeting that you have created in the „Initiate” section.
The status of a participant („Present”, „Absent Excused”, „Absent without Excuse”) or a note for a participant can be recorded by double-clicking on that participants name.
Objectives and Non-Objectives
Here, you can define the purpose of the meeting or identify topics that will or will not be the focus of the meeting. Use the + and - button to add or remove entries.
Hint
- To rearrange entries, select the desired row(s), click the left mouse button and drag the row(s) to the desired location.
Agenda
The agenda items are defined in the agenda area. Click the + button to create a new entry, name the agenda item and enter the duration. iMeetingX will automatically calculate the start and the finish. Of course, you can also set your own start and finish values. To add a responsible participant to an agenda item, double-click on the people button at the end of the row. Once the menu has appeared, select the chosen person and press the „Assign” button. If the desired person does not appear in the list, go back to the „Initiate” section and add this person to the „Participants and Distribution Group” area.
Hint
- To rearrange entries, select the desired row(s), click left mouse button and drag the row(s) to the desired location.
Attachments
Press the + button or use drag & drop to add external documents to your meeting. These are attached to the invitation and the meeting minutes when sending an email. If you don't want to send a specific attachment with your invitation or meeting minute, click on „Edit Attachment” in the context menu („action” button ![]() ) and deactivate the option „Include in Mails”.
) and deactivate the option „Include in Mails”.