Manage tasks, hold meetings and send meeting minutes
All necessary tools to manage tasks and assign them to meeting minutes are available in the „Task” section. To manage tasks, iMeetingX uses the project management method „Getting Things Done” (GTD).
Action items, decisions, ideas / notes or requirements can be added before, during or after a meeting. It's also possible to assign further information, incl. start and due date, responsible person, priority, description, status, attachments, etc., to each entry in the task list.
If necessary, these entries can be assigned to a specific meeting or agenda item, or additional documents. Unlimited attachments can be assigned to each entry. All attachments are automatically managed in the iMeetingX project file.
As soon as the meeting is over, you can send or print with just one click on „Send Meeting Minutes” or „Print Meeting Minutes” in the toolbar or in the context menu („action” button ![]() ).
).
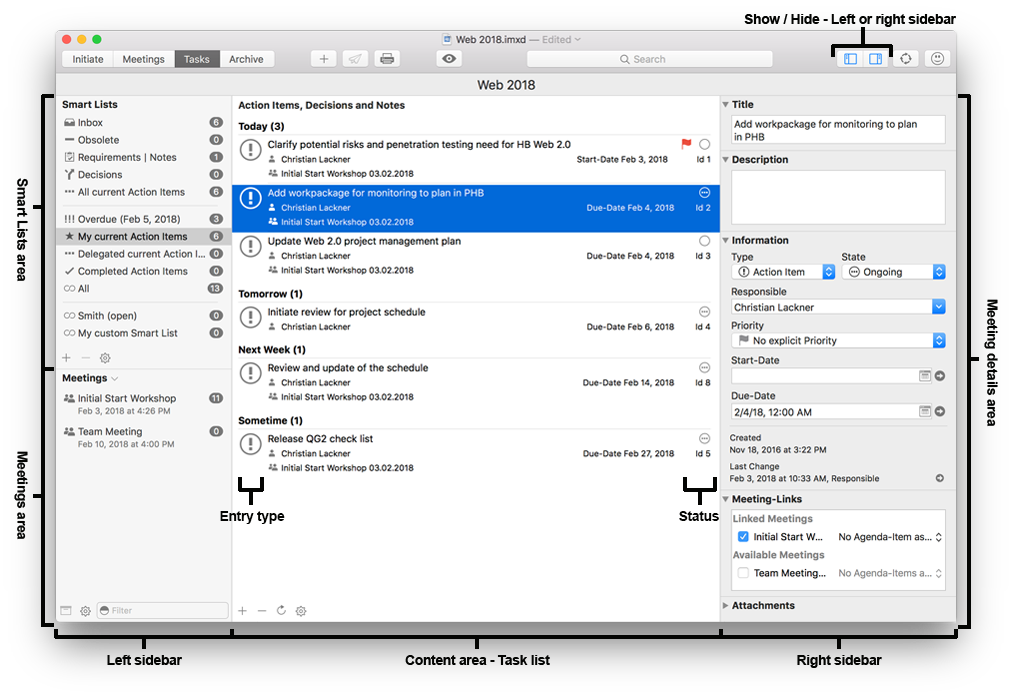
iMeetingX provides smart lists for task management based on the project management method "Getting Things Done". This will automatically assign your entries to a smart list depending on the status, responsible person and due date.
Of course, the + button or the context menu („action” button ![]() ) can be used to create user defined smart lists, which meet individual needs. The editor for user-defined smart lists contains all conceivable filter variants.
) can be used to create user defined smart lists, which meet individual needs. The editor for user-defined smart lists contains all conceivable filter variants.
By default, iMeetingX includes the following smart lists:
- Inbox: New entries automatically have the status „Waiting”. Ideas or thoughts can be captured in the inbox immediately and can be specified or planned later. Only when the status is set to „Open” or „Ongoing” are these entries relevant to the task management; for example, they can be automatically assigned to the smart list „All current Action Items”.
Entries with the status „Waiting” are not available in any other smart lists. - Obsolete: Shows you all currently not relevant entries. An entry can be set as „Obsolete” by changing the status in the right detail-area.
- Requirements / Notes: Shows all entries with the type „Idea / Note” or „Requirement”. Entries with the status „Waiting” or „Obsolete” are excluded.
- Decisions: Shows all entries with the type „Decision”. Entries with the status „Waiting” or „Obsolete” are excluded.
- All Current Action Items: Shows all entries of the type „Action Item” with the status „Open” or „Ongoing”.
- Overdue: Shows all entries with a due date of today or in the past.
- My Current Action Items: Shows all entries assigned to the author with the status "Open" or "Ongoing".
- Delegated Current Action Items: Shows all entries of the type „Action Item”, where the responsible person isn't the author, and the entry has the status „Open" or „Ongoing".
This area shows all meetings that were created in the section „Meetings”. Meetings, which are listed in the section „Archive”, are not available in this list.
Meetings can be displayed or hidden with a click on the ﹀ button, located to the right of the heading „Meetings”.
To see all details of a Meeting, such as participants or the agenda, simply double-click on the meeting name.
To reschedule a meeting, switch back to the section „Meetings” by clicking on the „Meetings” toolbar button. Changes can then be made before switching back to the section „Tasks”.
To change the status of a participant, double-click on the name of the participant or right click on the name of the participant and use the context menu („action” button ![]() ).
).
There is a function in this context menu to send minutes to the chosen person.
To „freeze” the current state of entries assigned to a meeting, move them into the „Archive” section using the „Archive” button or the context menu („action” button ![]() ). It's recommended to do this after the minutes of a meeting have been sent.
). It's recommended to do this after the minutes of a meeting have been sent.
Note:
A meeting, which is already moved to the „Archive” section, can't be reactivated after the iMeetingX application is closed. Meetings in the „Archive” section are only available for research purposes! Entries assigned to an archived meeting are still available in the task list and can be edited or assigned to other meetings.
Use the + or - button in the toolbar or at the bottom of the content area to add or remove entries.
Hint
The shortcuts „ALT+ENTER” or „DEL” (macOS) or „CTRL+ALT+N” can also create or delete entries.
In the context menu („action” button ![]() ) there are a lot of additional functions applicable to entries. For example, a task list can be exported as a CSV file to allow further editing in an external application (Excel, Numbers, iTaskX, FileMaker, etc.).
) there are a lot of additional functions applicable to entries. For example, a task list can be exported as a CSV file to allow further editing in an external application (Excel, Numbers, iTaskX, FileMaker, etc.).
To export individual entries, select them before choosing the export option, or use a different smart list.
The sorting of the task list can be customized either with the button „Appearance" in the toolbar or in the context menu („action” button ![]() ) under „Appearance”.
) under „Appearance”.
Hint
To keep the task list compact, long titles and descriptions can be shortened by disabling the „Show whole title” or „Show description” options in the „Appearance” dialog from the toolbar.
All options for the selected entry are displayed here and will change when another entry in the task list of the content area is selected.
Structure of Entries:
- Title:
A comprehensible, short and concise description of the document items. - Description:
Supplementary factual information. This field adapts automatically and can be any length. - Type:
iMeetingX distinguishes between four entry types:-
 „Action Item” is used to capture all activities that require an action. This is the default entry type in iMeetingX.
 -
 „Decision” is intended for decisions, votes and decisions to be taken.
 -
 „Idea / Note” should be used for subordinate or participant-specific information.
 -
 „Requirement” captures a claim or expectation (e.g., of the client).
-
- Status:
For more detailed monitoring, a status can be assigned to each entry:-
 „Waiting”
 -
 „Open”
 -
 „Ongoing”
 -
 „Completed”
 -
 „Obsolete”
For more information about how smart lists are affected by a status change, see the smart lists description. -
- Responsible:
A person performing a task, making a decision or making a note. - Priority:
Importance or ranking of the entry. - Start-Date:
Is an optional input which determines the time from when, for example, an action item can be started. - Due-Date:
Time until an action item must be finished, or a decision / comment must be made. The deadline. - Created:
Creation date of the entry. - Last Change:
Complete documentation of all changes that are made to an entry. If necessary, the change history can be saved as a CSV file or the change log can be deleted.
Click on the arrow at the end of the row and choose „Save Log” or „Clear Log”. - Meeting-Links:
Every entry to a meeting and agenda item can be assigned using the meeting-links in iMeetingX.
To create meeting minutes, the desired entries must be assigned to a meeting.
To group entries in minutes under various agenda items, these entries have to be first assigned to the desired agenda items and then the option „Grouping Mode Agenda Item” chosen in the section „Initiate” > „Meeting Types and Appearance” > „Meeting Minutes” (double-click on this icon).
If this option is not selected, iMeetingX will group the entries in your meeting minutes by entry type (Action Items, Decisions, Ideas / Notes and Requirements).
The sorting of the entries under the agenda items or entry types corresponds to the setting defined in the task list.
A detailed description of how the appearance of invitations, meeting minutes or lists can be customized can be found in section „Initiate”.
Entries to meetings can be assigned with drag & drop or also with the use of the „Meeting-Links” function in the right detail-area. An assignment can be adjusted at any time as long as the meeting has not been archived. Assignment changes, like all other changes, are listed in the change-log.- Use drag & drop to assign entries
Step 1: Assign an entry to a meeting
Select the desired entries in the task list, which should already be assigned to a meeting, and drag them to the relevant meeting in the left sidebar („Meetings” area) with the mouse button pressed down. The entries are assigned upon release of the mouse button.
Step 2: Assign an entry to an agenda item
Double-click on a meeting name to open the meeting’s details. Then select the desired entries and drag them to the relevant agenda item. The entries are assigned upon release of the mouse button.
The created assignments will appear in the detail-area under „Meeting-Links” > „Linked Meetings”. Meetings are listed on the left and the associated agenda items on the right. - Use the detail-area to assign entries
Highlight an entry in the task list, which should already be assigned to a meeting, point to the box „Meeting-Links” in the detail-area and choose the desired meeting under „Available Meetings”. If needed, the corresponding agenda item beside the meeting can be further specified.
- Use drag & drop to assign entries
- Attachments:
Use the + or - button to add or delete attachments to the selected entry. As usual, this function is also available in the context menu („gear” or „•••” button).
Another option is to use drag & drop to attach relevant documents to an entry. Select the document and drag it with pressed mouse button to the „Attachments” box in the detail-area. The attachment is assigned upon release of the mouse button.
Notes- Documents can only be assigned with drag & drop from the Finder. For example, to assign an email, it should first be dragged to the Finder, and the mouse button released. Drag & drop can now be used to assign it to an iMeetingX entry.
- Once an attachment has been assigned to an entry or meeting, iMeetingX takes over the file management. Document changes remain saved in iMeetingX.
When a meeting is moved to the „Archive” section, copies of the assigned attachments are saved with the current state of the documents.
Of course, further editing of an entry and its attachments can be done at any time in the „Tasks” section.